
FARGO — As I write this, in just a few hours, we will be on the road to Indiana to take our son, Giovanni, back to college. It is past midnight, my family has gone to bed, and the house is quiet after a week of flurry and activity. We’ve been busy shopping for new clothes and supplies, cooking and baking his favorite dishes, visiting friends, going on little adventures and tackling endless loads of laundry.
I have been in a state of flux this week, and I am grateful for this quiet time as I prepare to say goodbye to my favorite human on the planet.
For Gio’s last home-cooked meal before he returns to dining hall food, he requested my
Sheet Pan Chicken Thighs with Potato Gratin
(last year’s most popular recipe), roasted asparagus and these Mini Peach Galettes.
This should have been an easy menu for me, but I nearly messed it up with the dessert. I had a disk of pastry crust in the freezer, but amidst all the hustle and bustle this week, I forgot to buy fresh peaches. I only realized this mid-afternoon and did not have time to run to the store.
“Don’t worry, Mom,” Gio reassured me. “We have a whole bag of sliced peaches in the freezer.”
This was true; we did have frozen peaches from last August, but I had concerns about how they would hold up after being frozen for a year. “Um, isn’t that why we have a deep freeze, Mom?”
It was a fair point, but I had never used frozen peaches for galettes and worried they might make the pastry crust soggy. So, I went online to determine the best approach — should I thaw the peaches or keep them frozen?
After some research, the answers seemed to be both yes and yes. Without a clear consensus, I decided to follow my instincts. The frozen peaches were coated in small bits of ice, so I laid them out on paper towels for an hour to thaw, and I also added an extra tablespoon of flour to the filling to offset any excess liquid.
Contributed / Sarah Nasello
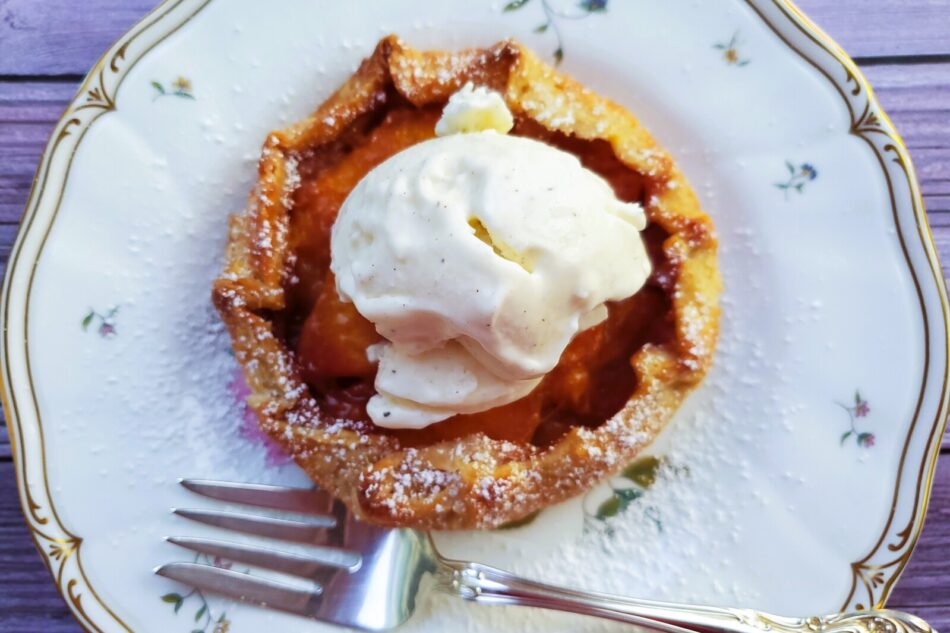
A galette is essentially a free-form pie, sweet or savory, and they are generally quite simple to make. This recipe is no exception — all you need is one pie crust (homemade or store-bought), a pound of sliced peaches, white and brown sugar, flour, cinnamon, vanilla and butter. You can make one large tart, but I prefer the flexibility of small, individual pies.
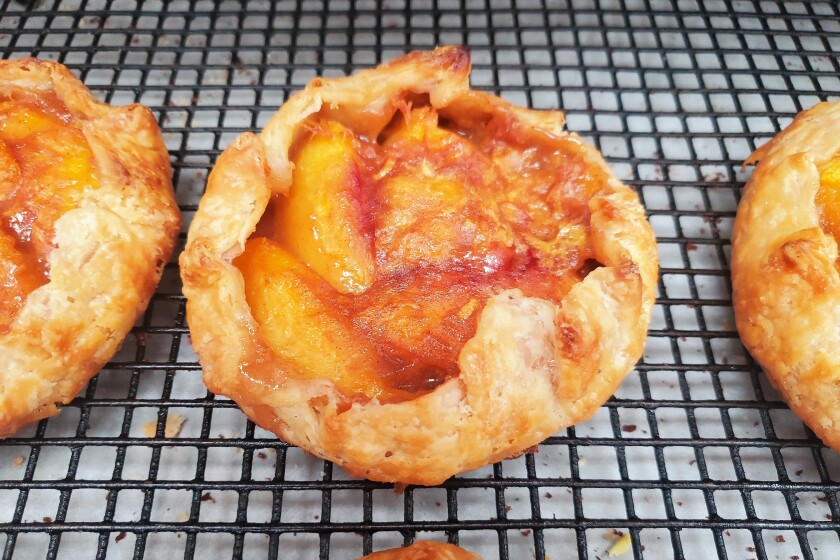
I prepared the galettes and popped them in the oven, practically squealing with delight when I pulled them out 25 minutes later. These Mini Peach Galettes turned out perfectly. The crusts were crisp and golden brown, and the thick peach filling was beautifully enclosed in each little pastry bundle. They were a hit!
I breathed a sigh of relief and made a note to search my deep freeze for other treasures once we return to our empty nest next week. I’ll be sure to keep you posted.
Contributed / Sarah Nasello
Makes 4 or 6 individual galettes
Ingredients:
- 1 unbaked pie crust (homemade or store-bought), refrigerated
- 1 pound peaches, sliced into pieces 1/2-inch thick (thaw first if using frozen peaches)
- 1 tablespoon all-purpose flour (add 1 more tablespoon if using frozen peaches)
- 2 tablespoons brown sugar
- 2 tablespoons granulated sugar
- ¾ teaspoon ground cinnamon
- 1 teaspoon pure vanilla extract
- 1 tablespoon butter, cut into ¼-inch pieces
Directions:
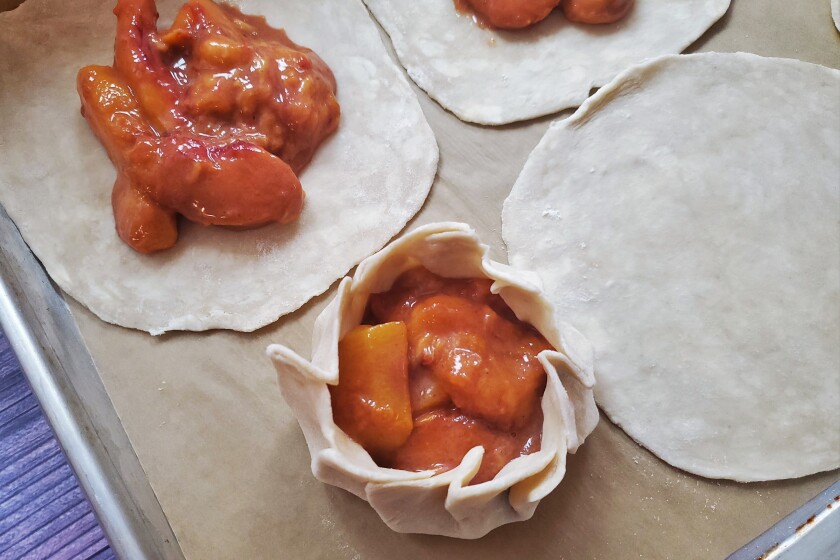
To form the galettes: Divide the disk of dough into 4 or 6 wedges. Use your hands to shape each wedge into a ball and then flatten it into a disk. Lightly flour a work surface and roll each wedge into thin circles of similar size — they do not have to be perfect circles.
Place the dough circles onto the parchment-lined baking sheet and refrigerate for 15 minutes while you prepare the peach filling.
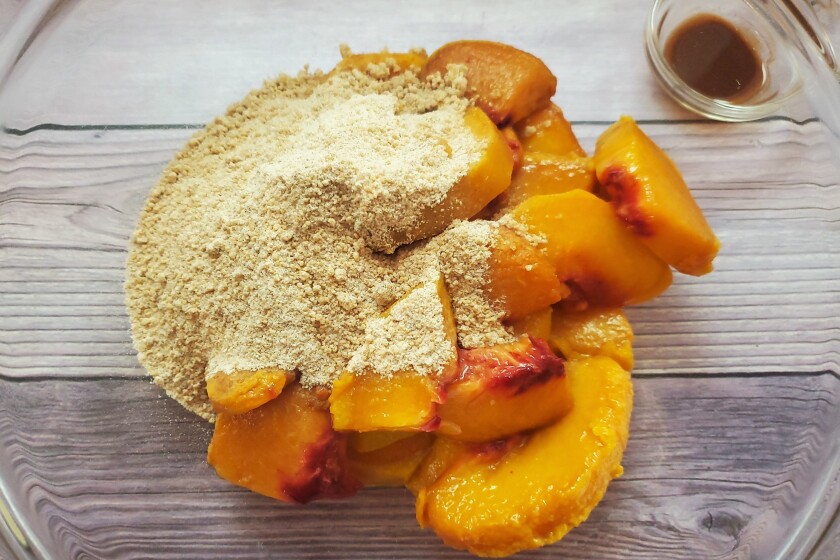
To prepare the filling: In a small bowl, combine the flour, sugars and cinnamon. Place the sliced peaches in a medium bowl and add the flour mixture and vanilla. Stir well until well combined. If using frozen peaches, be sure to thaw them first and drain any excess liquid before adding the flour mixture.
To assemble the galettes: Remove the baking sheet with the dough circles from the refrigerator. Place a half-cup of the peaches in the center of each circle, but do not include any of the excess juice.
Contributed / Sarah Nasello
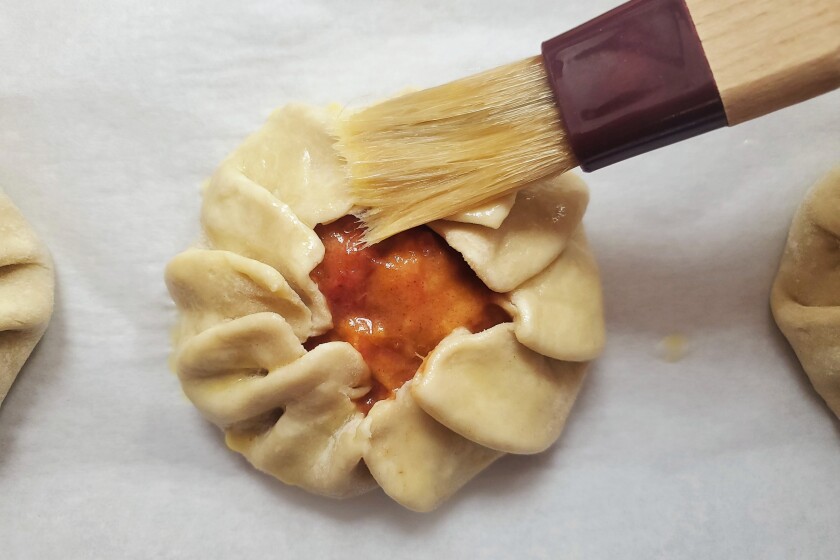
Dot the peaches with several small pats of butter. Pinch the sides of the pastry together, accordion style, then cup your hands around the folds and gently press them down and inward to create a bundle to hold the peaches.
Refrigerate the galettes for 20 minutes before baking (the cold will enhance the flakiness of the pastry crust).
To freeze unbaked galettes: Place the baking sheet with the galettes in the freezer for one hour until hard and firm. Wrap each galette tightly in plastic wrap and then transfer to a plastic freezer bag or airtight container and freeze for several months. There is no need to thaw them before baking, but you may need to extend the baking time by 5 to 10 minutes.
To bake: Prepare an egg wash by mixing one egg with 1 teaspoon of water. Brush the crust of each galette with the egg wash and sprinkle with sugar for a golden brown finish. Bake in the center of the oven until the crust is golden brown and the peaches are bubbling, about 25 to 28 minutes. Remove from the oven and transfer to a wire rack to cool. Serve warm or at room temperature.
Sarah’s All-Butter Pie Crust
Makes 1 pie crust
Ingredients:
- 1¼ cups all-purpose flour
- 1½ teaspoons granulated sugar
- ½ teaspoon salt
- ½ cup (1 stick) unsalted butter, cut into 1/2-inch cubes and chilled until very cold
- 5 tablespoons very cold water
Directions:
In a food processor, mix the flour, sugar and salt together until combined, about 15 seconds. Add the very cold butter and pulse 8 to 10 times, until the mixture appears coarsely ground with large pats of butter still visible.
Add the water and pulse again about 8 to 10 times, just until the dough begins to form clumps but is still crumbly. The sound of the processor will change once the dough starts coming together, which is an indicator that it is ready.
Turn the crumbly dough out onto a large piece of plastic wrap and use the plastic to pull the dough together, then gently flatten it into a disk about 1 inch thick while inside the plastic. Wrap the disk tightly in the plastic and refrigerate for at least one hour before using, or up to 3 days. The dough can also be frozen in a plastic freezer bag for several months; thaw overnight in the refrigerator before using.
Contributed / Sarah Nasello
- To achieve the best crust, use very cold butter and water and avoid mixing or handling the dough too much.
- Small bags of pre-measured butter cubes will keep in the freezer for months, so you have them available when needed.
- This recipe can be doubled to make 2 crusts.


